Pages

Monday, July 26, 2010

Pretty Blue Eyes

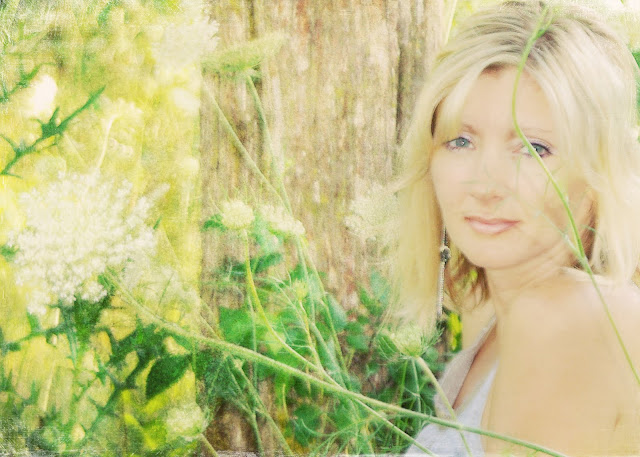
It doesn't get much sweeter than this....a 2 year old baby girl with soft blonde hair and pretty blue eyes.  
Yep, I'm one lucky photographer because that's exactly who I had an opportunity to photograph a few weeks ago.


I've mentioned before how I've used the Orton effect on portraits and here's another example of the great dreamy effect it can add to your photo...
I opened my original photo in Photoshop Elements 6 for Mac:

First I cropped in close...{did you expect anything different?!}
Next I softened the skin, did a light skin glow and defined the eyes in Coffeeshop Baby Powder Room:


Then I ran the Orton Effect action and lightly erased on her face and heavily erased on her eyes...you see the little alien face that's been created on the layer mask by doing this...


Finally I ran the Coffeeshop Vivid 2 action and selected the Soft layer at 60%...

Here's my final image....she was perfection to begin with, I just tweaked the photo~


And don't forget...I'd love to see YOUR photos that you create...post to my facebook page and share the love!


Tuesday, July 20, 2010

Winners! And 25% OFF Supernatural Textures!

THANK YOU to everyone who entered for this giveaway and left your insightful comments!
I love reading about how others use their textures and how they've transformed our editing capabilities~


Now, on to the winners!  These 5 people will receive a set of the Supernatural Collection from Patti Brown:


Kim Hartmann
Charlottes Web
Tara Eckert
Traci 
Sarah Cox


If you see your name please email Patti at:
patti@pattibrownphotography.com
I've emailed her your names and she will be expecting to hear from you to confirm your win and send you your download.  


It's so hard for me to not be able to give everything to everyone!  But Patti has been very generous and offered a 25% OFF DISCOUNT for everyone who wants to purchase her fabulous Supernatural collection!    Just use the code "wayoutnumbered" when checking out for your discount.  How cool is that...I have my own discount code!  


{by the way...using that discount brings this set to under $30....way cheap!}


So get your textures and Get Busy!!  And don't forget that I'd love to see your creations with textures or anything else...post to my facebook page and show off your wonderfulness!  Just search "Inspired by christy" and Like my page!


And....since I MUST have a photo in a post...here's one more shot of yours truly edited with a texture from the Supernatural collection....Sarah had requested a "color" photo of myself and this is the best I could do!  Take a good look because I won't be posting pics of myself again anytime soon~  I prefer to show off my beautiful models!


Friday, July 16, 2010

Win Patti Brown's Supernatural Collection!

If you've lingered around here for any time at all, you may have noticed that I'm a huge fan of textures~
Yeah, I am.


What you may not have known is that Patti Brown's Dream Collection is the set that began my texture obsession.  I had never even heard of textures before but when I saw her collection I immediately knew that those tools would allow me to add the feel to my photos that I wasn't able to portray on my own.


Anyway, Patti has been super busy since that first collection and she's just released her newest texture set which is totally out of this world!  It's the Supernatural Collection and you are soooo gonna want it!
Lucky for you, she's giving away 5 sets to wayoutnumbered readers!!!


I really, really recommend that you take a look at Patti's site to see all that can be created with these *fab* textures.  She has simple, easy-to-follow video tutorials showing tons of tips for using her textures in different opacities and also great recipes for combining multiple textures ~ which I love to do!


The Supernatural Collection is excellent for not only adding texture to your image but also in changing the coloring/tone of an image, almost like an action.  I tend to use them mainly for their texture but visit her site to see inspiring Before & Afters showing all kinds of alterations.


For today's post though I'll show you a very simple edit using just one texture from the Supernatural collection...I'll be using a photo from a model who rarely submits to photo shoots...me:)  ...but hubby insisted I be in front of the lens for once~


Here's my original in photoshop elements 6 for mac:


I cropped and added Earthly Being III...you can take a look at all that's going on in this texture here...


I'm really likin' this one....I'm also fond of the Gothic and Otherworldly versions...aren't the names just the coolest?  There's also an entire folder of textures with this set already converted to Black & White...very handy...although for some reason I used the color one on my photo and then converted the whole photo to black & white...don't ask me why~


Here's the final...the Earthly Being texture was just what I needed for that background...

Now on to the good stuff....5 sets of the Supernatural Collection are up for grabs...here's the details:

For One Entry:
  Leave a comment on this blog answering the question....
     "How has the use of textures changed your editing style?"
    Do you use them for light manipulation....for heavy texture on backgrounds...to add a different feel to      photos such as vintage or urban?  I want to know!

For A Second Entry:
Post a link on your facebook page or blog to this giveaway and then leave a comment here telling me you've done so.  Be sure to include a link to your page so I can make sure everything is legit~

Only Two Entries per person~

Contest ends Monday, July 19th at midnight Eastern time.  {I extended the time since I'll be out of town Sunday night}  Winners will be chosen with Random.org and I may let my kiddos pick a few numbers too.  5 Winners will be announced Tuesday afternoon so be sure to check back to see if you're a winner!   Good Luck!

Tuesday, July 13, 2010

For You Drama Lovers

You probably already know it, but I like a little drama ~
Only when it comes to photography....I prefer my life drama-free!


Here's a great shot of Queenie that I just had to add a little drama to...


I opened my original, which ain't half bad, in Photoshop Elements 6 for Mac:

I softened the skin in Coffeeshop Baby PowderRoom just a little, I wanted to leave it very
natural looking and make sure the skin texture remained...I didn't have a soft look in mind for this photo.  Then I cropped in close.

Next I added a texture but erased most of it from her face...


Then I ran Coffeeshop Raspberry Tea action and it looked like this...


...which I *almost* liked but just not enough, it looked a little flat...so I ran Coffeeshop Butterscotch Vintage on the photo and lowered the Contrast Boost layer to 67%...


And ended up with this...


It's gritty and dramatic...just like Queenie!

What do you think.....the first edit (Raspberry Tea) or the final edit?  

Thursday, July 8, 2010

Anatomy of...Luau Girl


I recently had the extreme pleasure...and new experience...of shooting a Luau 60th Anniversary party.  
It was such a great learning experience for me, I've never photographed a group of over 40 people before!
Luckily, I'm bossy and demanding so I really had no trouble ordering everyone around and telling them where to stand and what to do:)  The entire family put up with me so well and I really enjoyed my evening and was so thankful they asked me to be a part of such a momentous occasion.  


I also hit another bit of luck when one of my favorite little models from last fall decided to sit still for just a moment for me.  I snapped away for just a minute or two and got some great images her family loved.


Here's a very simple edit from one of the shots...
I opened my original pic in Photoshop Elements 6 for Mac:


I really wanted to focus on those beautiful eyes so I sharpened them using PW Sharpen This action...


Next I perfected the facial area just a bit using Coffeeshop Baby Powder Room action...smooth skin, skin glow and eye define...


Then I wanted to soften the outer edges of the picture so I duplicated the layer and used Filter - Blur - Gaussian Blur to blur the entire picture then erased the blur off the eye & nose area to bring the focus back on those areas.  I used a heavier opacity brush on the eye area then lowered it around her hairline and mouth for a subtle blurred transition.  Being subtle usually doesn't interest me but in this case it was necessary!


Then I added a texture from ShadowHouse Creations, added a layer mask and erased most of it off her face...


Finally I ran the Pioneer Woman Seventies action and lowered the opacity to about 65%...here's my final shot...


She's Absolute Perfection~

I liked the original pic too with her cute little hand in it but I just have this obsession...I Must Crop!
What do you think....do you like the cropped or uncropped version best?

Monday, July 5, 2010

Anatomy of...Queenie

I just recently had the pleasure of taking some photos of one of my lifelong, bestest girlfriends ever, Queenie.


Queenie embodies the epitome of professionalism...always wearing a suit or business attire and perfectly put together.  She didn't even own a pair of jeans until about a year ago!  She told me she was in need of some new professional images for her Image Consulting site so I agreed to do her photos...on one condition:  that she let me take some "fun" photos of her when the pro ones were finished.  She agreed, thinking the whole time that she wasn't going to have to leave her precious suit:)  


I finally managed to talk her out of the suit and into a pretty little sundress.  She almost had a nervous breakdown walking from the changing room to the woods...even turned around once and said she just couldn't do it, she was craving the safety of her professional clothes!  Of course she didn't win that battle and finally...after seeing the finished results...admitted that the sundress was worth it after all~


Here's what Queenie looks like when she wakes up in the morning...


Yes, she's gorgeous and impressive but I was wanting to show something...more ~

Here's a very simple edit that I performed on one of her pics...
I opened my original in photoshop elements 6 for mac:


Next I cropped the photo and softened the skin using Coffeeshop Baby PowderRoom.  
After that I wanted to add a little more color to her eyes since I knew I was going to be fading the color in the final version...so I lassoed the eyes and went to Enhance - Adjust Color - Color Variations and increased the green.

Next, as usual, I added some textures then erased them partially, but not entirely, from her face...


Then I ran one of my super favorite actions, Pioneer Woman Seventies and lowered the opacity to 67%...


Then I noticed that her hair was a little flyaway on the right side so I did some cloning and cloned over it ...it looked like this before I cloned it...


...and this afterwards, which I thought looked a little too perfect...


So I added a layer mask and brought back in some of the flyaways for a more natural look...


What do you think...would you have fixed the hair?   
Here's my final...


Waaaaay better than a suit!!

Here's a few more from her shoot...she's never had photos like this before~


There were so many fabulous shots from this session....of course I've got a dramatic one that I'll show the edit on soon...stay tuned!


Blog Designed by Rita of CoffeeShop