Pages

Tuesday, August 17, 2010

Mission Impossible

Princess has been the "cover girl" of my photography business for the past year {much to her brothers' dismay} but recently I wanted to update my business cards and some marketing with a new photo.  But I really liked the old photo I've been using because it's very striking and displays my dramatic style perfectly.  {plus I'm biased and just love showing off my baby girl...!}


So, I attempted to do the impossible for my new marketing and that was to re-create a dramatic, intense photograph of my daughter that I could use in my marketing and evoke a similar look & feel to my previous photo.  No biggie!


I actually had a lot of goals in mind when I loaded up the punks for the yearly family photo shoot...I'll share more of those later....so here's what I was able to achieve for this specific goal....


Here's my old photo that's been on my business cards, website splash page, marketing info...


I think it's very eye-catching for marketing purposes and I just like it.

And here's this years shot that I wanted to use on my new marketing pieces...

I opened my original in Photoshop Elements 6 for mac:

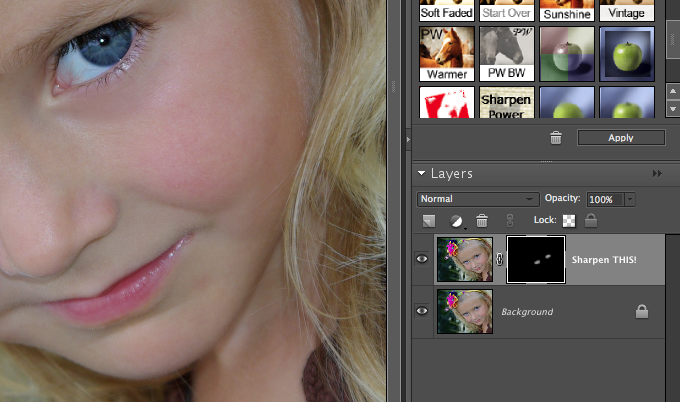
The first thing I wanted to do was sharpen those eyes so I ran Pioneer Woman's Sharpen This action and just brushed the eyes with my brush at about 28%....I've read you're supposed to sharpen last but I couldn't wait...I don't claim to be technically correct~
{also, I really hated to do it this time but I cropped the photo too for a better Rule of Thirds composition}


Next I wanted to focus more on the expression and less on the surroundings so I duplicated the layer
and selected Filter - Blur - Gaussian Blur at 9.4 pixels over the entire photo...

Of course I didn't want her whole face all blurred out so I added a Coffeeshop layer mask and erased the blur heavily on her eyes and mouth and lighter on the rest of the face...you can see the little alien face in black on the layer mask that shows the lighter and darker erasing...


Next I added a texture from the Supernatural collection for just a touch of dimension, nothing fancy this time....and I erased almost all of it from her face and just left it on the edges...


Then I ran the Coffeeshop Butterscotch Vintage action to brighten up the skin tone and because I just love it so much.  It still didn't have the punch I was looking for though so I ran the Coffeeshop Vivid 2 action and selected the Soft setting but erased some of it lightly off her face...

And here's my final~  Meet the cover girl for Inspired by christy 2010!


So let's take a look at my mission:
~ pretty blonde girl - got it!
~ striking blue eyes - got it!
~ intense dramatic attitude - got it!

I'm satisfied with my attempt for a similar look without copying the same exact pose....
what do you think?


Thursday, August 5, 2010

Anatomy of...Pretty Pretty Girl

Let me just say, when you have to look no further than your own family for the most beautiful, most fun, most striking models, that's a really good thing!


My 'nieces' were in town last week and I couldn't wait to do a photo shoot with them.  I tried some new props and they showed up with tons of great accessories...we had plenty of jewelry, fun clothing and even argyle socks~  Can't go wrong with argyle socks!


I've got lots of photos I'll be sharing from their shoot but here's one that I thought you may enjoy seeing my editing process...this one is of Beautiful Emily who is just a natural in front of the camera~


I opened my original in Photoshop Elements 6 for Mac...

I loved her expression here but wanted to change the composition so I cropped the photo but wound up losing space on the left side.  My pic looked like this:

So I chose the Clone tool and cloned in some more of the weeds.  This background is pretty easy to clone but a more detailed background would have been tough~  My final cloning wasn't perfect but I knew I'd be adding some texture so I thought it was good enough...here's what it looked like:


Next I softened the skin in Baby PowderRoom and did a little "facial treatment" on just one little part of her eyebrow...I chose the Clone tool again and cleaned up her eyebrow so it was a finer line along the edge...just call it a pain-free waxing!  
This is what it looked like Before I waxed {cloned}....and you can check out the After on the final pic because I forgot to take a close up shot of it!

It's the fine, little details like that that can make all the difference in your images ~

Next I added a texture from the Supernatural collection...something soft and dreamy...
then added a layer mask and erased most of it off her body...


Next I wanted to increase that dreamy look so I ran the Orton action and reduced the opacity to 82%...


Then, because I just wasn't content with the feel of the photo, I duplicated the layer and ran a Gaussian Blur on the top layer and erased most of it off her face and shoulders...this really intensified the dreamy background...


If you'll notice the black part on the white layer mask you'll see some that's gray and some that's black...this is where I used a lower opacity brush on the edges and a higher opacity on the face.  This eases the transition from focus to blurred and makes it look more natural...or at least that was the plan!

Finally I wanted to brighten the photo just a bit so I ran Coffeeshop Vivid 2 and used the Soft layer at 38% and lightly erased the Vignette in the right corner...


Here's my final...


Isn't she lovely ~

More photos coming from this session including her sisters - Twins! - and argyle socks!


Blog Designed by Rita of CoffeeShop