Pages

Showing posts with label photography. Show all posts

Wednesday, August 3, 2011

Changing Your Shutter Speed Will Change Your Life!

Back in the olden days when I knew nothing about photography...like, a few months ago, I used to think that shutter speed was only important when shooting things like sports or at night.  But I'm here to tell ya, I was wrong.


Shutter Speed is just as crucial to great exposure as Aperture and ISO.
My very basic definition of Shutter Speed is how long your shutter is open, which determines how much light is let into your photo.
The longer it's open, the more light that comes in, the lighter your photograph.
The shorter it's open, the less light that comes in, the darker your photograph.


The number values with shutter speed are the amounts per second your shutter is open...250th of a second...800th of a second...and so on.  When I'm trying to decide if I want to let in a little light or a lot of light I get confused sometimes when I'm thinking in numbers.  But I never get confused when I'm thinking of food so I do this little trick...I ask myself
"Do I want a piece of a pie that's cut into 250 pieces or a piece of a pie that's cut into 800 pieces?"  Obviously the pieces of a pie cut into 250 pieces are going to be larger than if it's been cut into 800 pieces...get it?
So if I want a lot of light I choose 250...if I want a little light I choose 800...


That's way too much math for me so here's a few photos to show how changing your shutter speed, and nothing else, can dramatically alter your portraits.


The glamourous shooting location for this little lesson is the shed in my backyard!
The sun was way too bright to shoot in so the shed was providing a great spot of open shade.
I shot with my back to the sun so my model could face the light source, which gives great catchlights
in the eyes, but still be evenly lit without harsh shadows.  


If you look at the pavers you can see very clearly the line of shade and sun.  There wasn't a ton of room but I just needed some close ups so it was perfect.


My model for all of 10 minutes was my Wild Child.  Ain't he pretty??

I set my camera to Manual mode.  My aperture was set at 2.5 and my ISO was 250.  I didn't change those settings for any of these photographs.  All I did was change my shutter speed...I started out at 640 and worked my way down to 200 which is the lowest standard shutter speed my Nikon d300s will go to.  
These photos are SOOC...not been touched at all.


You should be able to see pretty obviously the difference in the amount of light coming in from 640 shutter speed to 400 shutter speed.


Here's a few more...

I could have achieved the same results in coloring by changing my aperture but I wanted to maintain
a 2.5 aperture so I could blur out my background.  So by changing my shutter speed I didn't have to lose any creative aspect.  I love that!


So get out and experiment with your Shutter Speeds...ya never know what you might create!

Thursday, June 2, 2011

Selective Focus Will Rock Your World


Did you notice those pretty little eyelashes?
Of course you did!


See these adorable newborn wrinkles on her tiny little hand?


Of course you do!


It's because I used my selective focus option that you can clearly see what I want you to focus on, and everything else is blurred.  


Selective Focus has rocked my world, and it'll rock yours too when you start using it.  I'm amazed at how many of my friends have these great cameras but have no idea this feature exists.  


Here's my very non-technical, easy explainable definition of Selective Focus:
Selective Focus lets you pinpoint the exact spot you want the focus of your photo to be, anywhere in the frame.  


Most digital cameras (not point & shoots, just ones with interchangeable lenses) have an area on the back
of the camera that lets you choose where to put the focus of your camera.  You can usually choose between Center Focus, Area Focus and Single Point Focus.  The default is usually Center Focus and most people never move that dial because they don't know what the other options do.  That's ok if you're one of those people, I was too, not too long ago!  But after I read my manual {hint hint hint}  I realized I had so many more creative options open to me by using the Single Point Focus.  Who Knew????


Here's what my Nikon camera looks like when I've selected the Single Focus option:


Now I can move my little red focus indicator around in my viewfinder to the exact place I want my focus to be.  I just use the little round dial on the back and with my thumb I move it up or down, side to side.  I think Canon's have a joystick?  Either way, it's very simple to move and after doing it a few times you won't even have to think about it, it will be second nature.


Take a look at these lovely ladies...they stayed in the same spot and I stayed in the same spot for both of these shots...all I did was move my focal point from one girl to the next.


See how easy that is?  I typically compose my shot first and then I'll  move my focal point to where I want it.  

Although I use Selective Focus for almost all my portraits, it's not a necessity for every photo.  When you're doing a large, serious group photo {hahaha} and you're wanting to make sure most of the scene is in focus, I usually use my Center Focus, like for this shot:


But if you're wanting to highlight something fabulous, like your daughter's pretty blue eyes....


...then dust off that camera manual and find out how you can start using Selective Focus to Rock Your World!


Friday, April 29, 2011

Behind The Scenes Newborn Baby Zara

So I had the Ultimate Extreme Pleasure of being with my *bff* last week during the birth of her second child ~ Zara.  Isn't that the coolest name!


And even though I was super excited for Sharon, I have to be honest, I was more excited for me that I had a newborn to photograph!  I've never done an "official" newborn session before but I've been blog stalking some sites lately and studying posing and props so I've been waiting for this gal for a while so I could try out all my newfound knowledge.  Well let me warn you....IT'S HARD!  


Yes, babies are bendable and are supposed to sleep thru anything during those first days of life but my experience wasn't all smooth sailing~  No matter how hard I tried she kept curling her fingers and I couldn't get those knees to bend for anything!  But in between the feedings and cranky faces she posed like a dream  and now I'm positively in love with newborn photography.  And with Zara.  


Here's some lovliness...just 6 days new~


And for all you Behind the Scenes junkies, here's my humble set-up in my living room...


I feel compelled to tell you that I only used that little stool for a few body part shots while mom was safely holding baby...the rest of the time I used a mega huge ottoman to lay the baby on.  It just looks so tiny from this photograph!  


And for you hardcore Behind The Scenes junkies I made a video!  Yeahh!  
Here's a quick peek with me basically showing you the scene above while trying to keep a hungry newborn from screaming in my arms.  Ohh these models....quite the Divas!!


Enjoy~


Wednesday, April 27, 2011

Makin' It Work ~ Using 1 Studio Light

While Erin over at Texas Chicks Blogs & Pics is away partying with the Royals this week, I've been featured as a guest writer again on her site.


If you're like me and sometimes you find yourself in less-than-ideal shooting situations, you may be able to relate to my Makin' It Work series.  In case you missed the first post,  Makin' It Work ~ Using Window Light can be read HERE.  


Today's post ventures into the fascinating world of studio lighting where I tell all about my first attempt at using a softbox.  You'll see exactly how I created this image...


So don't waste another second and head over to Texas Chicks Blogs & Pics for my ramblings on


Friday, March 25, 2011

Get Connected! Save $$ at Clickin Moms!

Wanna stay in the loop?  Then get connected!


One of the awesome things that I've learned the past year is how valuable it is to connect with other photographers.  My cyberspace photog friend Amy invited me to be part of a photographers forum and I can't express how much I've learned by participating in conversations with other photogs all over the country...and the world!  


It's comforting to see that other photographers have the same questions, fears and hang-ups that I've dealt with in this crazy adventure of the photography business.  Plus I've gotten awesome inspiration for marketing ideas.  This online group was my first endeavor into a forum and I've loved it so much that I joined another one today...because who really needs clean laundry and home-cooked meals???


Today I joined Clickin Moms and I can't wait to see what all is going on over there!  I saw a discount code posted on The Photographers Wall Display Guide {super awesome product!} and you know I love discounts so I jumped at the chance to save 25% off the membership.  I think the code is only good til midnight so join now and then find me on there and say hello!!   


Here's the code: FBFAN
and here's the link ~
clickin' Moms


Enjoy!

Monday, March 14, 2011

Sites Worth Stalking ~ All New!

So I was reviewing my blog last week and realized that time has passed quickly and I haven't updated
my Sites Worth Stalking in a while.  Sorry 'bout that!

But here's the good news....everyone on my Sites Worth Stalking page remains solid in their *fabulousness* standing!  And even better news, I've added some more absolutely incredible sites
that I firmly believe you all should be stalking each and every day.

For instance....Confessions of an Over 40 Makeup Junkie....the title alone tells ya it's gonna be good, I mean who doesn't love to hear confessions?  It has nothing to do with photography and everything to do with FUN!  Plus I hear she's got an awesome giveaway coming this week...Rainee Rae is what you call a hard-core shopper so I'm sure she's got something awesome for that....check it out:)

Plus she has pictures on her blog like this...
...that are actually relevant to her content!!


Another good one is Go 4 Pro...quite inspirational and full of ideas and encouragement if you're...how can I say it....."going for pro"!

These are just a few...check them all out and soak in the goodness of blog stalking.  And please....please...pretty please...share with me your favorite blogs to stalk!  I've got about 13 minutes
of my day where I have absolutely nothing at all to do!!!  I need more blogs to stalk!

SITES WORTH STALKING

Tuesday, March 1, 2011

The Wonderful World of Apertures!

I was hanging with Princess today outside {finally some decent weather!} when I realized that she would be the perfect model for a quick show-and-tell about Aperture.


The question I get asked by my friends more than anything else is 
"How can I get those great blurry backgrounds?"
The key to blurry backgrounds is your Aperture.  Your aperture setting controls your background focus more than any other aspect on your camera.


I could seriously spend hours days talking about the different aspects of aperture and how it relates to your focus and lighting, but I'll try narrow it down to baby bites and just show one thing at a time.


Today, I'll show you how changing those little numbers by just the smallest amounts can make a big difference in your images.


Here's the info:  
My camera was set on the Aperture mode.  I did that just for these shots so I didn't have to change all my settings for each one.
Most dslr's have "modes" on a top dial button.  The aperture mode is usually listed as "AV"...

Setting your camera to aperture mode lets YOU choose the aperture and your camera chooses the shutter speed and ISO.  This is easiest way to start experimenting with aperture if you're not wanting to shoot in full manual mode. 


Apertures or F stops are those numbers listed on the side of your lens.  For example, you may see a lens described like this:
50mm F/1.4
70-300 F/4-5.6
24-70 F/2.8 


The F numbers list the smallest aperture that the lens will open up to at any given focal length.  Here's a very basic explanation:
The smaller the number, the fewer things are in focus, the blurrier the background.
The bigger the number, the more things are in focus, the sharper the background.


You will not find that definition in any camera manual, but it's helped me in sorting out all this camera stuff!


So here's some pics to help explain what the aperture actually does in your image.  
I took my first picture after I set my aperture to the smallest number it would go.  On my lens {50mm} 1.4 is the smallest.  Not all lenses will go this low, some start at 2.8 and others at 3.5 or 4.  Check the side of your lens to see what your smallest aperture is.  I've labeled the pics as I changed my aperture setting each time and went up in numbers.


Take notice of how the tree branches and the house behind her are almost completely blurred at the 1.4 setting but definitely recognizable by the time I get to 3.5.


Now take a look at the next 3 images, you'll really be able to tell a big difference in the background at these higher apertures.  Look at the details in the tree trunk from 4.5 to 9.  

Can you tell the difference?  
Because I just love making collages {and more because Princess wasn't done modeling} I've made one more set for you to take a look at.  Check out the tree in the background and the lines of the fence...

I hope this helps someone but of course the best way to figure it all out is just do it!  Get out there and start changing up those dials and see what happens.  The more you experiment with it the more it will "click" with ya~ 


By the way...is there anything cuter than a little girl in piggy tails???

Thursday, February 11, 2010

The Left & Right Of It

This photo...

wasn't born this way.

Check out my post at TexasChicksBlogsandPics to see how angling just a tad to the left can make a big impact on your photos!

Friday, February 20, 2009

Before and After

I love photography.
I love everything about photography.
I love the equipment....the skill...the capturing of a moment...the digital readouts on my camera I don't understand...I love it all.
One of my favorite things I enjoy when looking at other people's photographs is seeing their Before & After photos.  I'm fascinated with the post-processing techniques that people use.
Post-Processing is ALL THE RAGE right now.
I'm sure you've heard of Photoshop, Lightroom, Aperture, even iPhoto has tons of processing techniques just a click away.  On one hand, it's kind of sad:  you don't have to be a great photographer to get great pictures.  On the other hand, it's exciting:
you don't have to be a great photographer to get great pictures!
I've just started documenting my own Before & After shots.  It's fun.  I've tried to show them to my friends and explain all the profound details in the editing techniques.  They don't even fake interest anymore.  They get that glazed look in their eyes and start staring off into the distance.  Someday when I'm gone they'll wish they had absorbed my wisdom.
So I'll use the blog so show some of my own Before & Afters to my millions of fascinated internet viewers.  A good fantasy life is healthy, right?
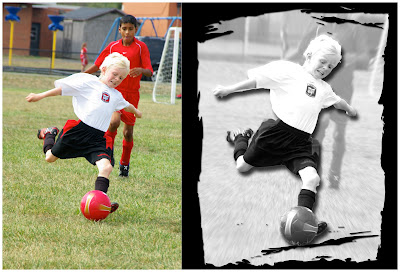
Here's a fun one of Rebel from fall soccer.  The straight out of camera (SOOC) shot is pretty good, but I can't help myself.  I must post-process.  So in just a few clicks I added a bit of oomph to #23 kickin' it!  
I may actually post a tutorial soon showing the steps I took to edit the photo.  A tutorial would make me feel so important.
 
Blog Designed by Rita of CoffeeShop